Industry aims for more accurate assessment of creep damage in high-temperature components
Compiled by Steven C Stultz, Consulting Editor
The High-temperature Defect Assessment conference has drawn international participation since its inception in April 1998. HIDA began as a European Commission and industry supported research project aimed at unifying defect-assessment procedures validated on materials of interest to high-temperature processes—primarily power generation.
HIDA continues to meet periodically in response to industry developments and with a strategic focal point. The first two events, in France and Germany, concentrated on the beginning and end of the original four-year European Commission program. HIDA-3, held in Lisbon, Portugal, focused on crack growth and repair of high-temperature welds.
HIDA-4, in the UK, saw an industry need to dive further into probabilistic assessment, and was followed by HIDA-5, again in the UK, to discuss fitness-for-service and risk-based inspection. Moving to Japan in 2013, HIDA-6 concentrated on martensitic steels and creep-fatigue interaction, followed by HIDA-7 (UK) discussing life and crack assessment for industrial components.
Like the first seven events, HIDA-8 was organized and coordinated by European Technology Development Ltd, Leatherhead, UK (www.etd-consulting.com). Its focus: crack inspection and assessment, repair options, and monitoring of cracks and pre-crack damage. Participants represented Australia, Belgium, Germany, Ireland, Italy, Japan, the Netherlands, Poland, Spain, South Africa, Sweden, Switzerland, the UK, and the US.
Dr Ahmed Shibli, managing director of ETD, opened the virtual meeting, held April 20-22, 2021, by stressing the values and benefits of this ongoing, dynamic collaboration thusly:
“Assessment of the behavior of high-temperature plant components containing defects and operating under steady and/or cyclic load conditions has become an area of urgent need and interest. We have strategically organized HIDA-8 into sessions dedicated to inspection, damage, and cracking under creep, fatigue, and oxidizing conditions; defects/cracks and life assessment; and martensitic steels—cracking, life assessment, and modeling.”
Selected highlights from the more than 30 presentations and online discussions follow.

Casting repair
Casting weld defects have become a significant industry concern.
Ronnie Scheepers, Eskom, South Africa, discussed acceptability assessments of casting weld defects under transient thermal loading. The basis of this presentation was weld repair of castings during both manufacture and operation, emphasizing the need for qualified welding procedures and strict quality control.
In many cases, cracking (on initial assessment) is attributed to in-service creep damage accumulation. However, consideration of specific geometry and operational stress distribution often suggest stress relief or reheat cracking because of an original manufacturing weld repair.
“Weld repair of castings during manufacture,” he stated, “is a well-known and acceptable practice if conducted in accordance with approved standards and procedures. However, cracking of these weld repairs in high-temperature and ageing plants, especially those operating beyond design life, is all too common.
“Structural-integrity assessments of such components must not only consider reduced material toughness caused by temper embrittlement, but also the stress intensities generated during transient thermal events, such as start/stops and quenching incidents,” he continued.
“Most defects are detected during outage inspections of in-service plants,” the speaker explained. “The focus then becomes a management strategy of replace, repair, excavate, or leave as-is.”
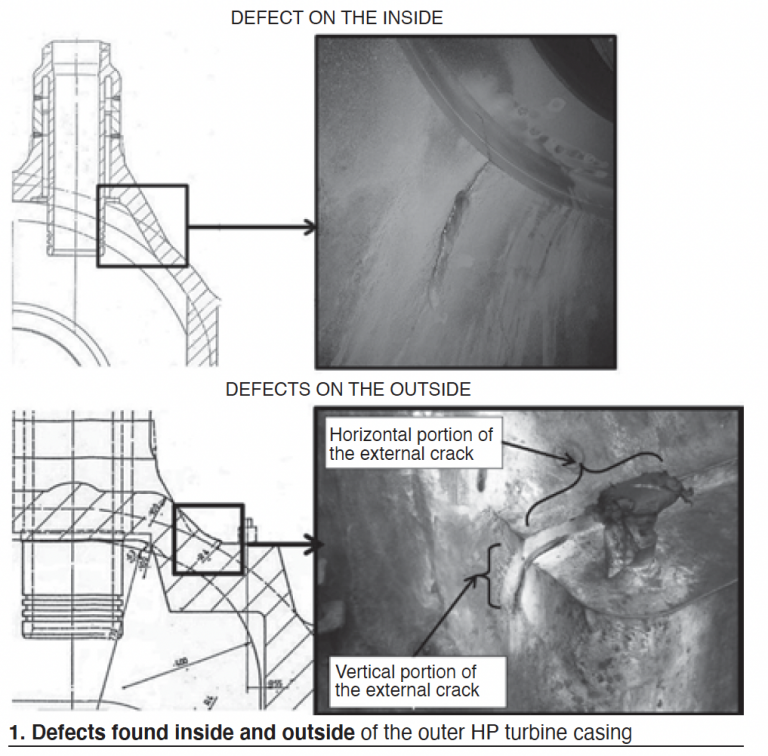
The first of two case studies presented by Scheepers discussed the acceptability of weld-repair defects in the outer casing of an HP turbine. This 1980s-vintage unit for a 618-MW site had logged 220,000 hours and 328 starts. Material of manufacture is GS17CrMoV5-11 (1.7706). Operating conditions are 4.3 MPa at 330C to 430C.
Phased-array NDT showed an internal defect about 48 mm deep in a wall of 114-mm thickness. An external vertical defect was about 78 mm deep where wall thickness (WT) was 108 mm; an external horizontal defect about 63 mm deep (108 mm WT). Refer to Fig 1. Remaining ligaments were clear of indications.
Microstructural evaluation showed a mixture of ferrite and mostly bainite, and confirmed cracks in both the weld and in the heat-affected zone. Cracks were oxide-filled with decarburization along crack lengths, and no indications of propagation.
Metallurgical assessments concluded significant temper embrittlement had occurred. This was considered in a finite-element-based structural-integrity assessment that reflected design operating conditions as well as a hypothetical quenching event.
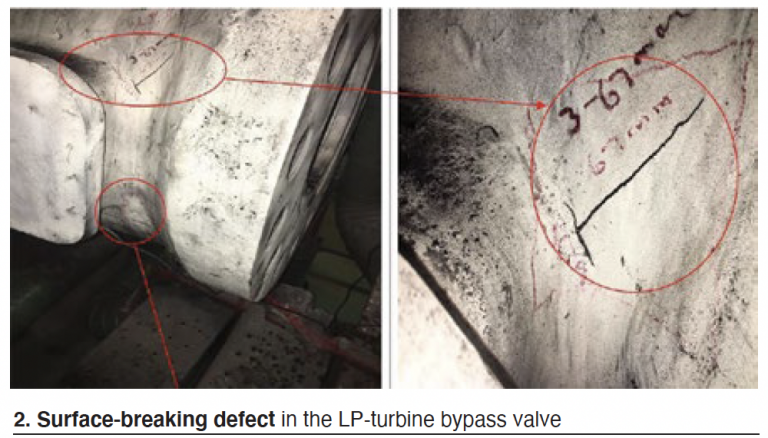
A second case considered an LP-turbine bypass valve, 1980s vintage from a 686-MW unit with 190,000 hours and 155 starts (Fig 2). Operating conditions were 4 MPa/535C during startup and shutdown; the baseload operating temperature, 248C. Material: GS17CrMoV5-11.
A 67-mm-long surface-breaking defect was identified by magnetic-particle test (MT); phased-array ultrasonic testing (PAUT) indicated a depth of 44 mm within 65-mm wall thickness. No other defects were found. A macro crack in the weld repair area was oxide-filled and micro cracks were found with stress-relief voids.
Weld repair had not been reported during manufacture.
In this case, the material temper embrittlement was found to be less severe, but the criticality of pre-warming to reduce transient thermal stress and, by extension, crack stress intensities during trips or shutdowns, was clearly demonstrated.
Remaining life assessments, in both cases, considering creep or fatigue crack growth and allowable defect sizes concluded the defects to be acceptable for operation to the next planned outage.

Predicting creep damage
Rolf Sandström, Materials Science and Engineering, KTH Royal Institute of Technology, Stockholm, Sweden, provided a tutorial on creep damage.
During creep deformation, he explained, several changes in the microstructure occur that tend to reduce the time to rupture. These changes include cavitation, substructure coarsening, particle formation, particle coarsening, and recovery of hardening phases. These are often referred to collectively as creep damage.
“Information on creep damage is used to predict the remaining life of materials and components and to improve the properties of existing materials,” he said. “To make predictions, accurate data about the creep damage is essential. Since extrapolation to longer times is almost always involved, methods must be available to perform this. Considering the number of damage types, it is a challenging task.”
He then clarified: “In recent years, creep models based on physical principles have been developed that do not rely on the use of adjustable parameters. These models are referred to as fundamental.”
Such models, he explained, represent a major advantage, since damage types that have not been possible to measure precisely can be predicted. In this way, a more complete picture of the creep damage can be obtained.
For several materials, rupture is controlled primarily by cavitation—at least when the stresses are not too high. Fundamental methods have been formulated that can predict the observed strain dependence of creep cavitation.
Referring to published works, Sandström noted that a common way to determine the creep damage has been to analyze tertiary creep. Changes in the dislocation structure are the main cause of tertiary creep, so the mechanisms are different in comparison to those controlling the failure. However, the data from tertiary creep still give valuable insight. “Fundamental models for tertiary creep have only recently been developed,” he said.
Sandström demonstrated that by taking all the main damage mechanisms attributed to dislocations, particle formation, and cavitation into account, the rupture life of austenitic stainless steels has been predicted successfully.
Sandström’s presentation was designed to review recent modeling of creep damage using fundamental methods. “In all work on creep,” he stated, “it is important to identify the operating mechanisms. To generalize and extrapolate the results can only be done if the operating mechanisms are known.”
He reviewed several examples where mistakes have been made in applying empirical approaches:
The stress exponent n is used as an adjustable parameter in many models, even in those that have a partially physical basis.
At the same time, the n value traditionally has been used to identify the creep mechanism.
This is problematic knowing that, for example, the creep exponent for dislocation creep can take values from 1 to 50.
It is documented that a stress exponent of 1 is not enough to identify the mechanism as diffusion creep.
Resolution, he stated, is in the use of basic (fundamental) models where the derivation of the model is based entirely on physical principles and all parameters are well defined and their values are known. There are no adjustable parameters involved.
He reviewed several models fulfilling these requirements, including:
Models for dislocation creep covering low-to-high stresses.
Models for solid solution and precipitation hardening during creep.
Influence of prior cold work on creep life.
Models for primary and tertiary creep.
Initiation and growth of creep cavities.
Development of cell and sub-grain dislocation structures.
“These models have been established for some materials but not yet for a wide range,” he stated.
He then listed and reviewed the basic models for predicting creep damage:
- Particle formation, transformation and coarsening. Can be handled with commercial thermodynamic software such as Dictra, Prisma, and MatCalc.
- Coarsening of substructure (important for 9Cr and 12Cr steels).
- Initiation and growth of creep cavities.
- Tertiary creep.
He went on to give specific examples.
“These models are predictable,” he stated, “and can be used for generalization and extrapolation.”

Single-crystal materials
Kurt Boschmans, ENGIE-Laborelec, Belgium, addressed evaluation of high-temperature creep degradation in single-crystal gas turbine materials through both conventional creep testing and small punch testing, comparing the methods.
In 2020, ENGIE performed a study to stretch the maintenance intervals of a gas turbine within its fleet by evaluating the condition of post-service turbine blades and vanes. In the framework of this study, the high-temperature creep properties of the materials were thoroughly evaluated.
“Historically,” said Boschmans, “this evaluation has been performed by conventional creep testing on airfoil and root materials, and by comparing the test results to the known properties of the superalloys in question.”
Boschmans then explained traditional comparisons of creep properties using a material-specific LMP (Larson-Miller Parameter) curve.
In the framework of the new and expanded data project, a comparison was made between the results of conventional creep testing (CCT) of sub-size creep samples and results of small punch testing (SPT). The goal was to evaluate whether or not SPT could replace CCT in cases where there is insufficient material available to extract an acceptable creep sample from the available hardware.
“Conventional creep testing,” he explained, “has a minimum size requirement: M5 sample with diameter of 3 mm to allow creep testing in air. Sample extraction thus becomes critical for first-stage blades, as well as for evaluating aeroderivative gas-turbine hardware, putting limits on the method.”
The option of using sub-size samples, he explained, is possible but expensive. SPT requires much less material (a 0.5-mm-thick disc-shaped sample), but at the time of this study:
No internal experience was available.
Registered exporter (REX) data on single-crystal superalloys (anisotropic material) was limited.
There were no known comparisons of both methods on the same turbine blade.
Several studies were reviewed indicating that a relationship (conventional versus small punch) appears valid for highly anisotropic materials such as single-crystal superalloy in certain conditions. A good LMP-curve correlation was reviewed.
“Results confirmed that the material properties at high temperatures are still corresponding to the requirements of new material, suggesting a stretching of the maintenance interval is possible for the specific blade studied.” However, this study is recent and microstructural evaluation of the test sample is ongoing (as of April 2021).
Conclusions:
- Evaluation of high-temperature mechanical properties of the same turbine blade by means of CCT and SPT verified both the feasibility and accuracy of small punch testing, for which no internal experience was available on single-crystal superalloy materials.
- Test results illustrate the SPT results show a good correlation with the CCT that was performed in parallel.
- For superalloy materials where the extraction of creep test samples is not possible, the application of small punch testing can provide an economical alternative to sub-size creep testing.
Operation in creep conditions
Jerzy Trzeszczynzki of Pro Novum, Poland, discussed the conditional operation of boiler components working under creep conditions until replacement, using a large utility boiler as an example.
One of the more serious operational problems is thermal-fatigue damage detected on internal surfaces of pressure elements (steam coolers and superheaters), especially those working under creep conditions. “Such damages are practically irreparable,” he said, “especially during a planned outage. They typically require fabrication of new elements.”
Using the technology of digital twins,, fracture mechanics, and remote diagnostics, Pro Novum has developed and implemented a methodology of conditional operation (until the element is replaced or the boiler is shut down) that allows supervision of the damage under the control of an appropriate software. “The system can simultaneously control the possible development of a dozen or so damages and assess the condition of the element online,” he explained.
The elements operating the longest in these test conditions have worked for two years. Ultrasonic testing during operation, and destructive tests after the disassembly of the elements, confirmed the possibility of computational monitoring of crack propagation with an accuracy sufficient for practical operational purposes.
Examples also were described for headers that received endoscopic examinations during a utility boiler renovation in 2018. Crack depth ranged from 2 to 10 mm.
These components work in creep conditions, but periodically are exposed to thermal fatigue and thermal shock because of water-injection and condensate events.
The program goal was to further assess damage through fracture mechanics and achieve a schedule for conditional operation. This would include monitoring of working conditions, and periodic assessment of the technical conditions.
Trzeszczynzki summed it up: “Component replacement time can be determined with acceptable accuracy by monitoring conditions of the initiation of new cracks and the propagation of the existing cracks using the online calculation method and by verifying the calculations with controlled endoscopic and ultrasonic tests.”
Using data scatter
“There is a large amount of scatter in the creep properties of welded joints of the steels; however, the scatter is not considered in conventional remaining-life assessments of welded joints of in-service piping.” This was the presentation opening by Masatsugu Yaguchi, Materials Science Research Laboratory, Central Research Institute of Electric Power Industry (Criepi), Japan.
“Thus,” stated Yaguchi, “we have developed a new method of assessing the individual creep properties of welded portions of actual pipes.”
This presentation explained the assessment method and described the actual implementation for Grade 91 steel, as an example.
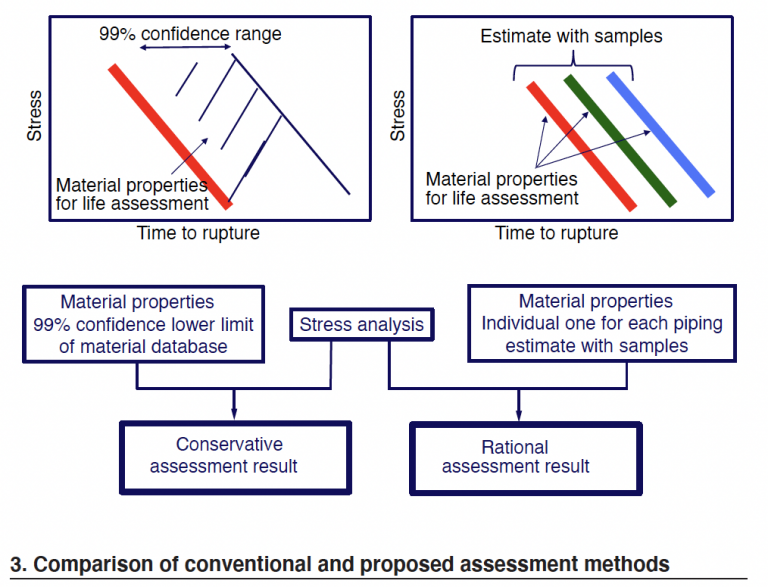
The premise: “Data scatter (heat-to-heat variations) has not been considered for remaining-life assessment. Test specimens are taken to conduct creep tests and to analyze the data, but there is no data for the actual component.”
In Japan, the common method of remaining-life assessment for materials is the 99% lower-limit curves for data obtained at various temperatures, on a typical stress versus time-to-rupture diagram.
The question remains: “Is the 99% lower limit, or minus-20% strength, really ‘the weakest?’ Also, materials used in creep tests do not cover all specification ranges of Grade 91 steels (Fig 3).”
“Therefore,” stated Yaguchi, “consideration of heat-to-heat variations is important.”
The institute’s program objectives: Propose a life-assessment method considering heat-to-heat variations, develop a database and elemental technologies for Grade 91 welded joints.
In the method described, the creep property of the welded joint is related to that of each base metal because the creep properties of welded joints strongly depend on the creep life properties of the corresponding base metals.
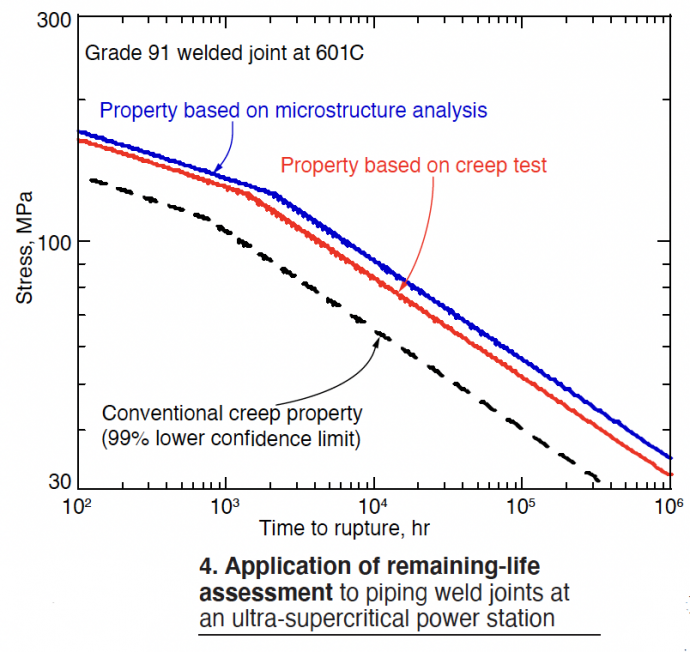
Microstructure analyses and small punch creep tests on samples cut from the base metals at the outer surface of pipes in service were conducted, and the results were compared with a material database to estimate the creep property of each base metal of the target pipe.
The precision of the remaining-life assessment of pipes is significantly improved using the developed method because it can consider variations of the creep properties of their materials, which are not considered in existing life-assessment methods. Then, the method was applied to the welded joints of the pipes in ultra-supercritical power stations during periodic inspections, and remaining lives of the components were estimated (Fig 4).
Research continues at the Central Research Institute of Electric Power Industry, Yokosuka, Japan.

Looking ahead
European Technology Development has been deeply involved in HIDA conferences for more than two decades and will continue to both participate in and organize future conferences. Cooperation and knowledge gained from these events are critical elements of ETD’s ongoing commitment to the global power industry.
Other examples of the consultancy’s involvement include a recently published study titled “Review of 9-12Cr Martensitic Steels for Pressure Vessels, Steam Piping and Tubing,” focusing on Grades 91 and 92.
The guidelines presented in this report are based on the experience of ETD Consulting, the reports and experience of its International P91 Users Group and ETD’s network of consultants, the experience of international industry in general, EPRI guidelines, and latest research findings. It can be a valuable resource to plant owners/operators for material quality control, fabrication/welding, inspection, monitoring and repair, and for understanding the incidents of cracking/failure and how to deal with these.
The guidelines are of greatest value to decision-makers at plant design firms, plant owner/operators, service providers and steel producers. For more information, contact enquiries@etd-consulting.com. CCJ


